How to Digitize Tons of Stuff
I have taught you how to do many things over the past few years, and you can review them all in the How Tos section of the blog, I really hope you use the knowledge you have gained from some of them, like How to Use “Lie” and “Lay” Correctly every single day. Especially if you are a fitness instructor. Posts like How to Buy Fruit - Lessons from the Fruit Nazi are seasonal, and now would be a good time to review that one. Others, like How to Recane a Footstool and How to Install a Swim Spa involve very specialized skills, but when you need them, you need them. As a matter of fact, even if you never plan to buy a swim spa, you should go back and read that one again because it is hilarious, if I must say so myself. It’s from back in the day when I was at the top of my game and, had The New Yorker known about me, they would have snapped me up in a heartbeat. So while this may not be the most entertaining post you have ever read here, I guarantee you will learn something and I predict that you will actually use that knowledge one day. I made some cutting edge discoveries during this adventure and I will explain everything I learned in this post.
Everyone old enough to read this post has lived in both analog and digital worlds, and we all know that the analog stuff takes up space. Lots of space. If you have even one box in your house that looks anything like this picture, you need me.

In the last post, when I explained what I had been doing that kept me from writing blog posts, I started to tell you about my massive archiving project. Several years ago, my children inherited many boxes of photos, slides, movies, scrapbooks and newspaper clippings. Some of them were two generations old, and contained photos and movies from as far back as the 1930s. Many of us have treasures like these — boxes of stuff that you cannot possibly throw away without going through them — yet the process of doing so is so daunting that it is hard to know where to begin. So we stow them away somewhere and pass them on to the next generation. Naturally, my children decided the best thing to do to was to store them in a spare bedroom in my house. I have a thing about liking to be able to walk into the rooms of my house so I nominated myself Mother of the Year and decided to tackle the project as a priceless gift to them. I say priceless, because scanning seven boxes of movies and photos of your ex-husband and his family is truly a labor of love. I had to figure out how to do a lot of things and, as always, I offer my hard earned research to you, my loyal followers, at no charge.
PHOTOS

My Canon ImageFormula R40.

These photos could be scanned in a single stack.
We’ll start with photos because it’s the least common denominator. Everyone has more photos than frames. It is absolutely true that I could have packed the whole kit and kaboodle up and mailed it to one of those digitizing services but, to be honest, there were just too many items for that and it would have cost a fortune. I started out using my flat panel scanner and decided pretty quickly that I needed to find a better way. I did my research on document scanners that can auto-feed stacks of photos, and procured a Canon ImageFormula R40. It is a fabulous scanner that lets you put a stack of photos in the hopper and press go. It will save them into the folder you choose, in what ever format and resolution you like and it does a fantastic job. You can pay a lot for scanners like this, which is why I want to tell you about this one because it is only $267. If you have thousands of photos to scan, it is totally worth it. I couldn’t be more in love with this scanner and, now that the project is (almost) over, I am happy to have it to scan office documents. It scans both sides of a document at once so it is super fast. That feature was helpful when there was writing on the back of a photo, so the photo and the documentation behind it appeared one after the other in the photo folder. Oh, and it doesn’t matter what size the photos are, as long as they fit. As a matter of fact, you can feed a stack of photos that are all different sizes. Did I just hear you say, “Wow?”

Now, if you have a bunch of photo albums and you don’t feel like taking all of the photos out to scan them, or maybe can’t get the photos out because they are all stuck, you can use the Photomyne app. I mentioned it about 5 years ago, back in 2019, in the 6 Apps That Will Change Your Life post, so you can go there to learn all about it but, basically, it lets you hold your phone above a page, press the button and it scans the photos as individual images. The quality is not as good as it would be if you scanned them individually because of glares and textures of the vinyl pockets that might be holding your photos, but it is a great way to quickly digitize a whole photo album. I mean, it is really fast.
NEWSPAPER CLIPPINGS

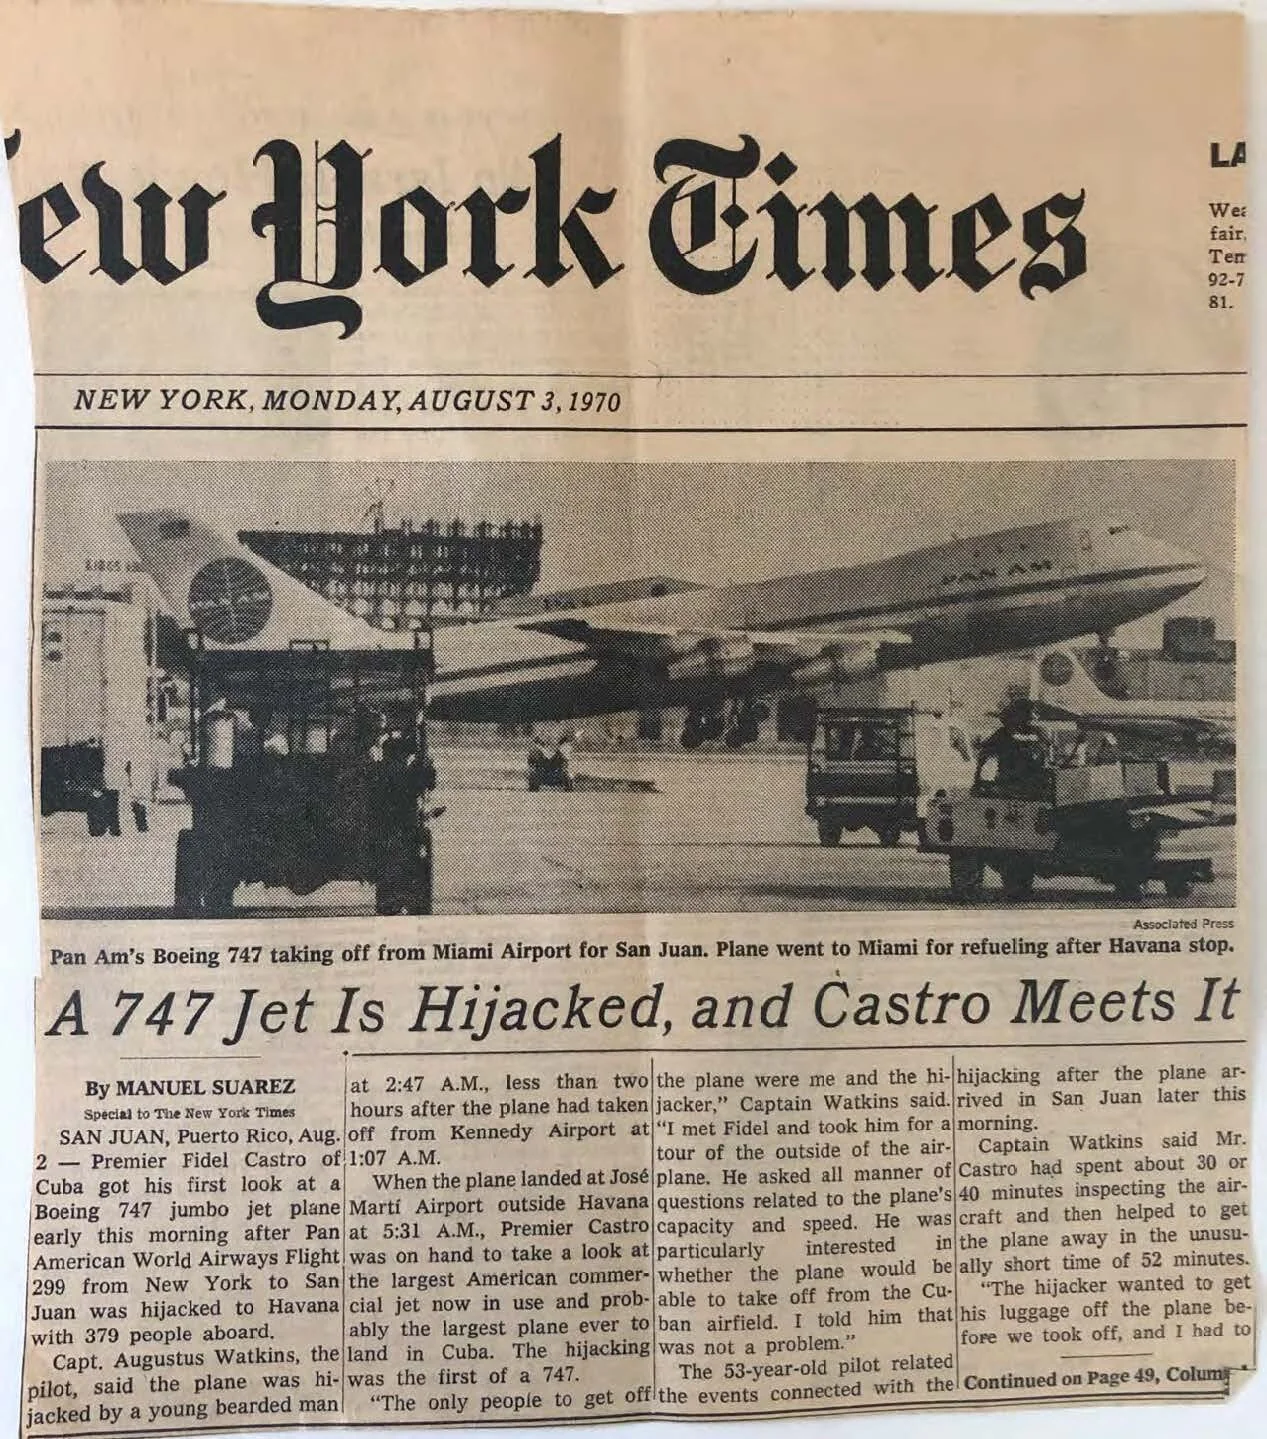
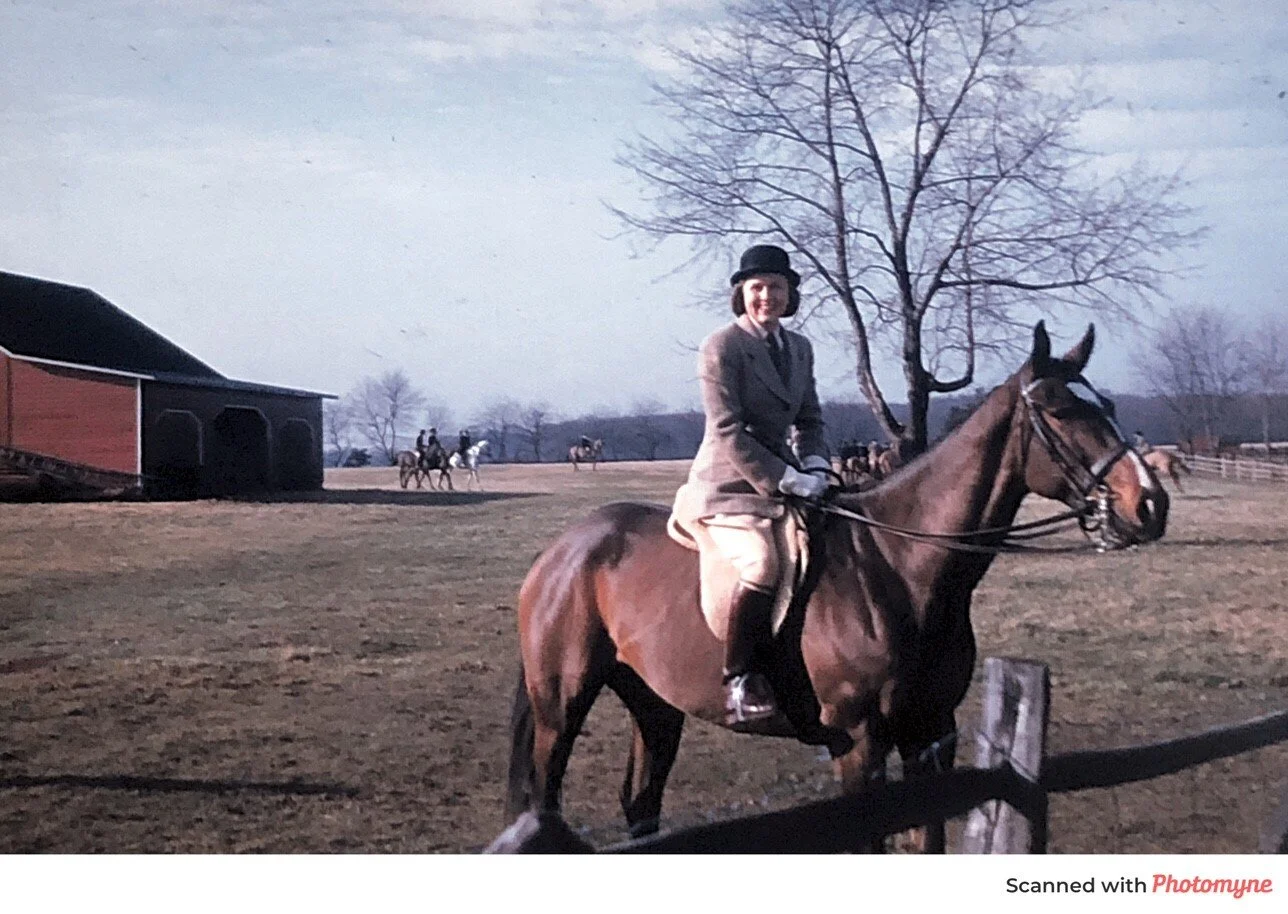
My children’s aunt won Olympic medals in Three Day Eventing and my former father-in-law was a PanAm pilot whose plane was hijacked to Cuba, so obviously there were a lot of newspaper and magazine articles. You can’t use my beloved document scanner for most newspaper and magazine clippings, or for things like scrapbook pages and photos mounted on cardboard and, again, the flat panel scanner was just too tediously slow. For many years I have used an app called TurboScan, made by Piksoft, as a scanner when I was on the go and needed to make a copy of something, so I tried that and it worked GREAT. You hold your phone as level as you can above the thing you are scanning, then press and hold the button. It takes three images in rapid succession and merges them into one high-quality image, automatically cropping around it. I would then send the images to my iCloud account where I could grab them and add them to all the other scans. If you have something that is too big for a flat panel scanner or too flimsy or rigid for a document scanner, this is a great solution.

SLIDES

What is it with slides? Why on earth did anyone ever take slides? I can’t think of a much more inconvenient medium. Do you think people really invited their neighbors over to see long slide shows, or is that just something you see in movies? I simply cannot imagine why my former in-laws had hundreds of slides, except that, back then, you couldn’t just Google “Machu Picchu” if you wanted a reminder of what it looks like. Do you think slide shows were the Instagram of the 1950s?
At any rate, there were about a gazillion slides, so first I went through them to pick out those that were worthy of digitizing. Let this be a lesson to you the next time you take photos on a vacation: No one will be interested in your photos of Machu Picchu 50 years from now. They just want to see your weird hairdo. You can pretty much hold a slide up to the light and determine whether it is of a landscape or a person, so that was the first pass. If there was a person in the picture I took a closer look with a hand-held KODAK 35mm Slide Viewer. If the person looked like someone my kids should keep a picture of, I put it aside to be digitized, and I’ll tell you more about that in a second, because I sent them away and had it done. But since then, I have discovered another completely brilliant option that I am starting to use. Because, of course, I missed a box that was in the back of the closet.
One day I was delivered an advertisement on Instagram about a slide scanning app. For a moment let’s try not to think about how creepy it is that Instagram knew I would give a shit about scanning slides and just talk about the app that I have now trialed and declare a winner. Prepare to be amazed, because here is a slide I scanned with this app on my phone:
If you have a fancy iPhone 11 like Tony does, the image would be even sharper. Why would anyone send slides off to be digitized when there is this?

The app is called SlideScan and it is made by Photomyne - the same folks who make the album scanning app from above. Here’s how it works: You open a browser on your computer or an iPad and go to photomyne.com/backlight. This is just a blank page on their website that provides a nice bright backlight for the slide. Open the SlideScan app on your phone, hold the slide in front of the backlight screen, and position the phone in front of it so that you can see the image. Press the button on the SlideScan app. It takes three quick images of the slide and - voila - the image is scanned.


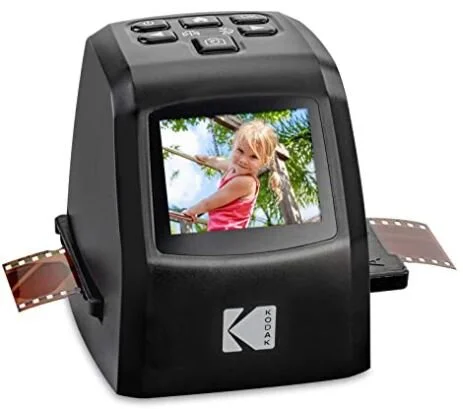
Full disclosure - there is another option that you will run into if you go online to search for slide viewers, and that is a device that you can buy to view and scan the slides to jpegs. They cost between $100 and $200 and I spent a long time thinking about whether I wanted to buy one. I asked around to see if any of my friends could also use a slide scanner, thinking I could form a sort of co-op and share one, but no one I know has a family that took hundreds of slides of Machu Picchu. Eventually I decided to go with a digitizing service since I also had many movies that I wasn’t about to convert myself. This one is the KODAK Mini Digital Film & Slide Scanner for $129.99 on Amazon and that is the extent of my knowledge about these devices. Because see above SlideScan app.
MOVIES
I had zero interest in learning how to convert two dozen old 8mm movies that were in the treasure chest, so I started shopping for a conversion company. Google “photo digitizing service” and you will get back pages of links to both local and online options. It took me a long time to decide which one to use and I ultimately settled on Legacybox, which I think of as the most well known of all of the companies. There are always coupons out there, so do not even think of paying full price. You can get 40% off any old day and I actually got 50% off. I had a lot of stuff, so I bought the 40 item trunk, which was $589 with the 50% off coupon. What is an “item?” An item is a movie reel, a VCR tape, 20 slides or 20 photographs. See why you want to do the photos yourself? They send you a box with a bunch of barcode stickers. I put groups of 20 slides each into ziplock bags and labelled them with a sticker, then I put a sticker on each movie. I packed up the box they sent and put it back into the outer box that came in, put on the return address postage-paid label they had also sent, and put it in the mail. It took a long time because of COVID, but eventually the box with all of the original contents was returned along with a USB drive that contained the digitized content. They let you pick whether you want a DVD, a USB or digital download, which is yet another difficult decision I am about to make easy for you.
FOREVER STORAGE

How to save this stuff forever? Can you say floppy disc, tape drive and Betamax? What will the gold standard format be in another 50 years? All of the options cost the same, so here is my reasoning: I think DVDs can be problematic and I have an unreadable warped one sitting on my desk right now to prove it. Legacybox describes digital download as the super easy way to share the finished content with others. But you don’t think they do that for nothing, do you? Eventually you have to pay a subscription fee. Who is going to pay that when I croak? And what’s going to happen to my stuff if the company goes out of business? And what do we do when we not only can’t find the link to the online content, but can’t even remember which company did it? I chose the USB because I knew I could copy it myself so easily. But USBs are really small, so I needed to figure out a way to give it to my children in a form that was big enough that they wouldn’t lose it. It turns out there are lots of options for gifting USB drives with treasured digitized content on them. Go to Amazon and search for USB keepsake and you will find all kinds of fancy boxes with hand-carved USB drives in them. I chose this one from Amazon. If you think the Memories label looks cheesy, you should see the other options. I received five 32gb drives for $40 which I thought was a square deal. I saved the content to my own server, which is meant to be a forever solution, then copied it to each of the USB drives to give as gifts, which I did.
DIGITAL FORMATS
This section is like the fine print at the bottom of a prescription drug ad. Nobody wants to read it but it’s for your own good and skip it at your peril. It’s the ugly stuff we haven’t talked about yet, but it’s important and, as always, I have sorted it all out so that you don’t have to. There’s a quiz to follow, so pay attention.
Once you actually decide to do all this stuff, you have to decide what the resolution will be and how you want to save the images - as .jpeg, .png, .tiff, .gif, .pdf? I told you about how there are so many settings on the scanner, so I did a bunch of testing to determine what the optimal resolution would be. If you are like my sister Norah and have a PhD but not a technical neuron in your pretty blonde head, resolution is expressed in dpi, or dots per inch. 200 dpi scans very quickly but the quality won’t be great. 600 dpi will look crisp but it will take a really long time to go through the scanner. Stay with me - you can do this. Each 100dpi takes almost twice as long to scan as the one before, so it takes about a second to scan a photo at 200 dpi and about 12 seconds to scan the same photo at 600 dpi. Wake up. I discovered that there was virtually no difference in the appearance of 400 dpi versus 600 dpi, yet it was more than twice as fast to scan at the lower rate, so that’s what I picked. For the file type, I went straight to .pdf with no compression because I ultimately found it tidier than scanning a zillion jpegs with sequentially numbered file names and then having a folder full of these loose photos. I sorted the photos into logical groups, each of which was saved into its own pdf document. Seriously — wake up. It’s almost over. They are easy to open and look through, and individual photos can be extracted from them as needed. Have I considered that .pdf may not always be a viable document format? Of course. But it has been around for almost 30 years and I’m sure my great-great grandchildren will be able to figure out how to export all the content to holograms or whatever format they use to show antique photographs in the future.
Comprehension question: If Betty scans 700 jpegs at 400 dpi and Sally scans 450 pngs at 600 dpi, who will be finished first?
Answer: Trick question. Jpegs and pngs are digital. You don’t have to scan them at all. You scan the photo and output to jpeg or png. Ha ha ha. I’ll give you a pass this time because you were probably still sleepy.
PHOTO BOOKS
Digitized content is all well and good, but pulling out your laptop to show your friends some photos would be as bad as the dreaded slideshow, so I made some coffee table books from a selection of the photos. We have used Snapfish and Shutterfly in the past to make photo books, but they only have landscape-style books and I really wanted a portrait orientation. I found that with Blurb. They have a fairly easy to use platform where you design your book but I did do a lot of editing in Photoshop before uploading the photos. It was just easier to crop and enhance them first. I was happy with the result and the photo books along with the USB drives containing 7 GB of priceless content were a big hit at Christmas.

Tada. That’s all there is to it. That and countless hours of tedious, mindless activity. But at times it was actually very entertaining to be reminded of my former in-laws, some of whom were very colorful characters. I’m planning to tell you some of those stories in a future post but, meanwhile, here is a teaser:
There is a new podcast out called Stay Away from Matthew Magill. So get this — Matthew Magill, aka Dorr Watkins (back row, left in the photo below), was my brother-in-law. Pretty juicy stuff, huh? Go listen to the podcast and when we get together again I’ll share some more photos and stories. You can’t make this shit up.
