How to make cool business cards

You have to admit, these are the cutest business cards you have ever seen.
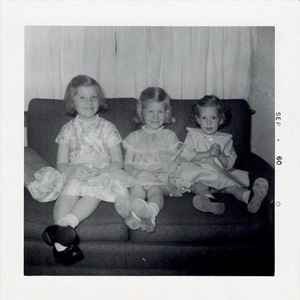
I can't stop talking about and looking at my adorable business cards. I fell in love with them the moment they arrived but now I know they really are adorable because I have been giving them to people and all anyone can say is, "How adorable." And then, if the card receiver is a woman, she will say, "That looks just like me and my sister(s)," usually in reference to one of the Easter photos, because it seems everyone in my generation did that Easter dress-up thing with the gloves and the hats and the little purses that held goodness-only-knows-what.
As long as you are not a banker, a lawyer or a physician, I think this style of card with a photo on one side and information on the other is a good one. For example, my friend Billy H. (who, as a grown up, goes by Bill H.) takes really beautiful photographs. I don't think he ever actually works as a photographer, but his photos are very nice and I think someone like that would enjoy handing out cards that show a photograph on one side and contact info on the other. I made these cards at moo.com, but it took a little doing to get them just right, with the photograph border and all, so I thought I would share with you how that is done. Moo.com doesn't recommend a border on cards, because they can't guarantee it will line up correctly, but I'm here to tell you that mine came out perfectly, after I made adjustments to allow for the bleed and trim.You can order 100 cards and put 100 different photos on the back and it costs the same as if you made 100 cards with the same photo on the back of all of them.
HOW TO SHOW SOCIAL MEDIA LINKS ON YOUR CARD
Does anybody to whom I give a Youngest Sister card give a shit what my mailing address is? Nope. Do they want to call me on the phone? Well, they might, if they want to talk to me about advertising and sponsoring opportunities, but the fact is I don't like to talk on the phone, so I'm just not going to give my phone number out. I recommend this because talking on the phone is overrated. If you don't start a conversation, you don't have to worry about how to end it. All anyone really needs is my email address and information about how to follow my blog. The tricky thing was figuring out how to show all that social media stuff on a card. I did a lot of research so you don't have to, and here's how I decided my card information should read:

I made my card in Photoshop and uploaded it, already formatted, but you can type the information in using moo.com as well. I'm just really choosy about layouts and fonts and colors and white space. You can find logos like the ones I used by just googling "social media icons." If you don't have Photoshop and want to do your own layout, you could use Powerpoint or GIMP, which I will tell you about next.
HOW TO FORMAT THE PHOTOS with old fashioned borders
I used ten different photos for the backs of my cards:


You can download a template for the photo side in lots of different formats. I used the Photoshop version and, after playing with it for a while, added my own inner guide (the yellow line) to their template to indicate the biggest area my photograph should cover. In order to make my old fashioned photo border wide enough to cover the safe area, the trim area and the bleed area, I had to make them fatter. I liked the dates and the hash marks and the oldness of the borders, so I made sure those were close enough to the edge of the photo that they were sure to make it inside the trim area. This was a bit of a pain in the ass, so I saved them as pngs so you can use them if you want to. Download the borders here. In case you were not aware, if you want an image to have transparency, like the cutout in the middle of my border images, you have to save it as a png or a gif. Jpegs do not support transparency.
I know everyone doesn't have a license for Photoshop because it is pretty expensive, so I made you a tutorial that shows you how to combine my transparent border image with a photograph so that it will look like it's an old photo using GIMP. GIMP is a free photo editor that is sort of like Photoshop, in that it supports layers, so I used that and walk you through the process, step by step in the video. Or should I say, Bridget walks you through the process. Bridget is the English chick computer-generated voice I decided to use in my tutorial. She couldn't say "Gimp" - she made it sound like "Jimp." So I had to make it "Kimp" because K is always a hard sound, no matter who says it. You're supposed to not notice that she is pronouncing a K because it's sort of a subliminal thing, since you are looking at the word while she says it. But now that I've told you, you're not going to be able to NOT notice it. She also has a strange way of saying "layers" that you will also not be able to ignore now that I have told you.
So there ya go. I think people might start treating these cards like the Magic trading cards my son had when he was little - collectibles. So if you want me to send you a bunch of my cards as a keepsake or so that you can hand them out to all your friends, just send me a message via my contact form. But first you need to subscribe, because you never know when I might send something special only to the people who subscribe. Because they really are my favorites.